Saturday 29 July 2017

Teak Trim Repair

I'm getting better at this woodwork gig. I had a teak moulding that had a big chunk out of it, and decided to repair rather than replace. Getting a colour match with the old teak is tough, the new stuff is always much lighter, but I'm pretty pleased with the result.

Roughly shaped piece gluing into position.

All finished.

Isn't this a wooden boat?

I fear a few purists are going to want to shoot me.

I needed to take a break from working on our cabin, so for a refreshing change I started working on a different cabin. The starboard cabin has been 90% finished for a long time, but the outstanding item is the bulkhead next to the outboard berth.

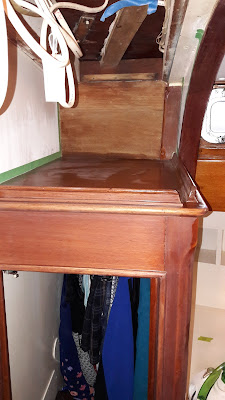
When the previous owner installed the new gensets, they had to run an exhaust for each genset. On the starboard side it exits the engine room through the watertight(ish) bulkhead and runs under the deck under the upper stringer. To fit the exhaust through (and a lot of new cabling) they cut out the timber supports for the bulkhead, leaving nothing for the panels to attach to, and the whole thing was given a hasty patch-up for the trip down from the USA.

The exhaust runs along the top. Note the size of the rightmost rib - they weren't cutting corners!

The panels are in two parts, the lower panel is original (and missing the storage locker that used to be built into it), while the panel on the top is a temporary piece of ply. I have no idea if it was originally in two parts or if they cut down the panel when installing the exhaust.

I could not install new verticals because the exhaust is in the way, so I needed to run a horizontal beam across the full width which I can use to attach the existing bulkhead panel to. I could (perhaps should) have done this with timber, but it would be bulky and getting everything squeezed in around the cabling etc was bit tough. So I elected to instead fit some timber supports on the fore and aft bulkheads and then run a 5 x 50 right-angle stainless steel beam fastened to the supports. Not wooden, but compact, rigid, and easy to fit (and remove).

Beam in place.
I have fitted the base panel back on and now I have a nice rigid bulkhead. Next steps will be to make up a new upper panel, build a new storage locker box to fit into the bulkhead, paint it all, and finally make teak trim for everything.  It's a good thing I don't have anything else to do...

Thursday 27 July 2017

More Progress

Starboard cabinside done.

Prep.

Finished.

Progress

We are getting really used to being lulled to sleep by the sweet smell of drying varnish. Can't be healthy. Anyway, making some progress, here's a couple of shots. Will finish the starboard cabinside tonight, then we have the final batch of varnishing to do before the real mess starts - painting.

Not finished yet, but getting there.

Finished the new trim around the mizzen mast.

Sunday 16 July 2017

Aft Cabin Dresser

Having varnished the port cabinside, we have moved onto the dresser. Unfortunately much of the existing varnish was tired and cracking so we have had to strip it back to bare wood. Cue lots of dust, sweat and swearing. Remember, we're still living in this cabin.

Psyching up to put first coat of varnish on - mmmm, solvent. Should have vivid dreams tonight!

Trim missing on the corner, and things generally a bit of a mess, due to previous removal of the companionway stairs when the starboard berth was converted to a double but the woodwork was never quite finished off.

Gluing in a piece to fill a hole in the dresser top. Something went through here, probably to do with the old companionway up through the hatch.
Corner trim gluing in place and stripping of old varnish under way.

Ready for final sand. The varnish below the dresser top is relatively new and in good condition, so we will just fine sand, touch up, and apply a couple of fresh coats.

Test fitting new teak trim for mizzen mast, yet to be fully shaped.

While in woodwork mode I've started making up other pieices that have been missing. This is in the nav table, I think a drawer was supposed to go in here but all the cables up to the nav station were run through the cavity instead. I intend to install some USB charger points in here, since we always seem to have at least half a dozen devices on charge.

Saturday 8 July 2017

Too Clever By Half?

As I posted a little while back, we started stripping back some paint in our cabin and getting ready to varnish and paint the whole thing. For some reason we decided that by careful planning we could do this while still living in the cabin. Hmmm.

Port
Starboard

Shitfight. Yes, we are actually sleeping in here.

The plan has been to do a chunk at a time, but it's been a little, um, messy. And stressful. Grumpy levels are up.

Port cabin side almost ready for re-coating.

Looking glossier now.

The upper saloon is unusable as well. Everyone very happy. Eh hem...

We have finished the port and starboard lockers, and the brightwork around the entrance to the cabin. Now we've started on the port side brightwork, one coat on. Lots more varnishing to do, then we have to do the paint. Goody.